From the conversion glossary
Concepts referenced in this article, defined.
Concepts referenced in this article, defined.
 d2c ecommerce
Quick commerce conversion optimization for D2C brands selling on Blinkit, Zepto, and Instamart - how 10-minute delivery changes the CRO playbook.
 d2c ecommerce
 d2c ecommerce
Run rigorous A/B tests and personalize every visit on Shopify or any storefront — no engineers required.
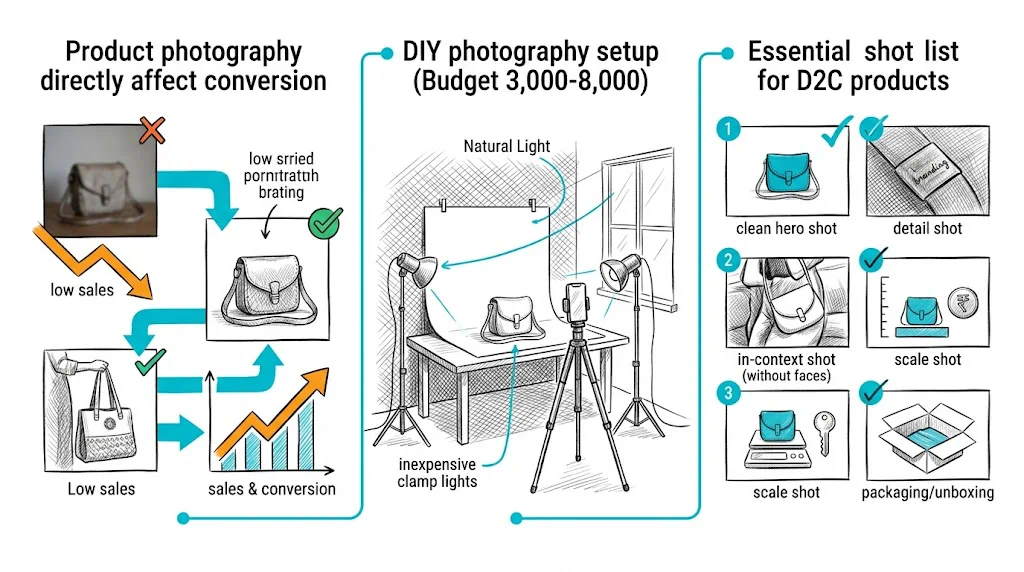
Product photography is the closest thing your online store has to a physical display. When a shopper can't touch, smell, or try your product, your images carry all the sensory weight. For Indian D2C brands in the early stages, the quality gap between professional and amateur product photography is one of the most common conversion rate killers, and one of the easiest to fix. This guide covers everything from a ₹5,000 DIY setup to directing professional shoots, with a focus on images that actually convert rather than just look nice.
The link between image quality and conversion is direct and measurable. Shopify data across thousands of stores shows that product pages with professional-quality images convert at 30 to 50% higher rates than those with amateur photography, even when the product is identical.
The mechanism is straightforward: poor images create uncertainty. If a shopper can't clearly see what they're buying (the texture of a moisturiser, the actual colour of a dress, the build quality of a bag), they won't buy. The bounce rate on product pages with low-quality images is consistently higher than on pages with clear, detailed photography.
For Indian D2C brands, this matters because marketplaces like Amazon, Flipkart, and Nykaa set the visual quality benchmark for your category. Your own website needs to meet or exceed that benchmark to convert unfamiliar visitors.
You don't need a professional photographer or studio to produce conversion-quality images. The equipment needed:
Lighting (₹1,500 to ₹3,000): A ring light (40cm diameter, ₹1,500 to ₹2,500) or two desk lamps with daylight-spectrum bulbs (5500K) placed at 45-degree angles to the product. Avoid direct sunlight, which creates harsh shadows and unpredictable colour temperature.
Background (₹500 to ₹1,500): Foam core boards (white and black) from any stationery shop, ₹150 to ₹300 each. A sweep background (curved white board) eliminates the line between surface and backdrop. A vinyl backdrop sheet (₹800 to ₹1,200) allows quick background changes.
Surface (₹500 to ₹2,000): A light grey or white table surface works for food and beauty. Marble-print contact paper (₹500) on a flat board gives a premium look. Wooden slats or craft paper suit lifestyle brands.
Tripod (₹500 to ₹1,500): Essential for consistency across shots. Wobbly hand-held shots look unprofessional regardless of lighting quality. A basic adjustable tripod costs ₹500 to ₹700.
Smartphone: Any flagship smartphone from the last 3 years produces sufficient quality. Enable RAW mode or Pro mode to control ISO, shutter speed, and white balance manually.
Total setup investment: ₹3,000 to ₹8,000 for equipment that lasts years.
Every product listing should include these image types:
Clean, sharp, centred product on a pure white background. Required for Amazon, Flipkart, and Nykaa listings, and it works as the primary image on your own website. This image answers "what exactly is this product?"
Specifications: RGB 255,255,255 background, product occupying 80 to 85% of frame, no shadows or props, no text overlays.
Front, back, side, and top-down views depending on the product. For a supplement bottle: front label (primary), back label (ingredients), side angle showing size and form, cap close-up showing quality. For a clothing item: front, back, close-up of fabric or texture, detail shot of print or finishing.
Product shown in the context of actual use. A moisturiser on a clean bathroom counter next to a towel. Protein powder shaker beside running shoes and gym equipment. A dress worn by a model in a setting that fits the brand's aesthetic.
Lifestyle shots answer "does this fit my life?" and are the highest-converting image type for social media discovery and Instagram ads.
Show the product next to a hand, a coin, or another familiar object to give shoppers an accurate sense of size. "10cm × 15cm" in a description is less intuitive than seeing a bottle held in a hand.
For beauty and health products, a close-up of the key ingredient (a saffron strand, an aloe vera leaf, a key capsule ingredient) communicates the product story visually. For fashion, a close-up of the fabric weave, stitching quality, or print detail builds perceived quality.
For skincare, hair care, and health products, before/after comparison photos are the highest-converting image type, but must be authentic. Use real customer photos with permission and clearly label as "Customer results vary" to comply with advertising standards.
You don't need Photoshop. Free and low-cost alternatives work for most D2C photography:
Snapseed (free, mobile): Good for white balance correction, contrast adjustment, and minor blemish removal.
Lightroom Mobile (free basic, ₹749/month for full): Professional-grade editing on mobile. Create presets for consistent colour grading across all your product shots.
Remove.bg (₹500 to ₹2,500/month): Automatic background removal for white background shots, which is essential for marketplace listing requirements.
Canva (free/₹3,999 year): For adding text overlays, labels, or feature callouts to marketing images (not for marketplace hero shots, which require clean backgrounds).
Editing checklist for every product image:
Texture shots are critical. The closest possible shot of a cream on a finger, a serum dropping from a pipette, or a powder swatched on skin communicates what product descriptions cannot.
Include a model shot showing the product on Indian skin tones. The absence of Indian skin tones in product photography is a consistent criticism of Indian D2C beauty brands from their customers.
Lifestyle context shots perform best: supplement bottle on a kitchen counter next to a glass of water, powder in a shaker at the gym, vitamins in a morning routine. These images sell the outcome, not just the product.
Flat lays on clean backgrounds work for budget shoots, but model shots perform better on actual product pages. If using model shots, ensure the model reflects the target customer's body type and skin tone.
Show fabric in motion where possible (a flowing dupatta, a structured blazer arm movement) to communicate texture and drape.
Natural lighting works best for food photography. Side or back-lighting creates depth and makes food look appetising. Show the product in its ideal consumption context: tea in a ceramic mug with steam, a healthy snack bar next to hiking gear, a cooking ingredient integrated into a completed dish.
DIY photography has limits. Hire a professional photographer when:
Budget for professional product photography: ₹5,000 to ₹20,000 for a full product shoot day (8 to 10 hours, 3 to 5 products, white background plus lifestyle variants). In metros, expect the higher end; in Tier-2 cities, often 30 to 40% lower.